
Part 3: Meshing, UVMaping, and Texturing of a Chair
Please excuse any spelling or grammar mistakes. I wrote this over the course of a week and I'm sure I missed something.
Click Images to enlarge.
Today I am going to be working on my 500+ Tumblr Followers Gift.
I separated everything into chapters to keep it organized. You can also skip a head if you understand what I am talking about in a certain chapter.
Chapter 1: Preparing to Mesh
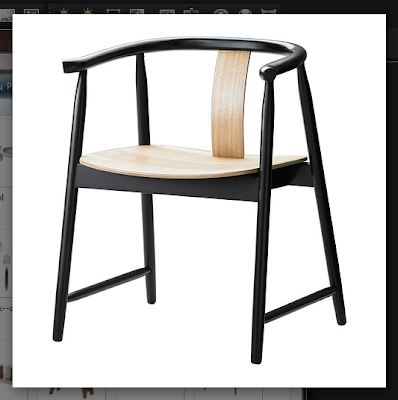
I am going to start with a dining chair I found at IKEA's website that I absolutely love. This is the first step; find your inspiration. I saved the image I found to my computer so I could go back to it as needed and look at it.
Here is that picture. It is Ikea's TRENDIG 2013 Collection Chair.
Sometimes you just have this image in your head that you want to make but you aren't sure if it exist. When this happens I try to sketch out something that I can use as a reminder. I suck at drawing so when that fails me I try really hard to find something similar online.
Now that I have my inspiration I am going to open it up in my photo editing program (PaintShop Pro X4 for me) and I am going to analyze it. I try to imagine what the best shape is that could use for each part.
For this image I see four cylinders for legs. I also notice that they are slopping at the ends. This tells me that my cylinder is going to need more then one stack (how may cylindrical parts are on top of one another). Now I need to figure out how many slices I want it to have (think of a round pie that you are cutting, how many slices will that round pie be. This also affects the smoothness of the cylinder.).
After thinking about the size of the legs to the over all shape I think that the best way for me to make the legs is with a cylindrical shape with 3 stacks and about 8 slices. The legs are also connected by 2 spokes that have the same shape as the legs.
Under the seat I see two rectangles with possibly on two rectangles connecting them. These will be easy to make with the box shape.
For the Seat itself I see a rounded rectangle with a slight sloop in the middle. I will make this using the cylinder tool again with the settings 1 stack x 20 slices with the "close with triangle strip". I will then manually move the vertexes around using the scale and move tools. The same goes for the little piece of wood on the back between the seat and the arms/back rest.
Lastly for the arms/back rest I see a long cylinder which is slightly flattened for the back rest. It is also pretty wavy. For this part I am going to use a cylinder with the same amount of slices as the legs (about 8) but since it is more curved I am going to use more stacks. I am going to guess that it is going to need about 14 stacks total to get this shape. To insure that the sides are the same I will mirror which ever side I make first, about 7 stacks, so that they two arms are identical.
So after analyzing the picture I now know I will need:
6 cylinders which are 3 stacks by 8(ish) slices.
1 cylinder which is 7(ish) stacks by 8(ish) slices.
6 manually edited planes to make the seat and back.
After breaking it down like this it becomes much easier for me to make it in MilkShape. They use to call this an action plan when I was working on projects in collage.
Chapter 2: Meshing In MilkShape
Now we open Milkshape. I am going to zoom in (shift+scroll) until I only see one square per screen. In game a one wall is three squares tall so most items will be less then that.
Now I'm going to start by creating a leg and shaping it. So I click on the cylinder tool and change the stacks and slices to 3 and 8. I then use the scale tool to lengthen the gap in the center and tapper the ends to my liking. Lastly I am going to delete the tops and bottom to the leg since these won't be seen and will save a few polys. When selecting more then one vertex which are not next to one another just hold down shift.

And then we had a leg. I am going to use this as a base for the other legs and spokes but we will come back to that after we UVMap it later. Now we are going to work on the seat. So I click on the cylinder tool and make a cylinder of 1x20 with the close with triangle strip option. use the select tool to select the 2 faces on the ends, next to the single vertex and delete them. I then use the extended manual edit to move the single vertexes over to meet the line between the 2 vertexes next to it. I use the extended manual edit again to move the top and bottom vertexes so that they line up with the ones next to them. Now I use the scale and move tools to make a rounded rectangle shape.

This is the base for the seat. It will probably need some tweaking later but for now we can move on. We are going to make the back/arms now. I will do this the same way I did the leg. First I make a cylinder with the options 7x8 over that of the leg so that they are the same size around. After moving it over I will use the scale and move tools to get the desired shape and size I want. Then I remove the end on the top since like the chairs it won't be seen and will save some polys.

Believe it or or not we are now ready to start UVMapping the objects that we have Most of the meshing from here on with be mostly duplicating and moving the things we have now. I like to UVMap it before building the mesh if I can so that I can get nice straight lines. It will make the texture look better on the mesh. First I am going to name the groups so I can find them more easily in the UVMapper. I will then export it as a.OBJ file and save it with the name "chair.obj". It is also a good idea to save your progress as a milkshape file, just to be safe.

Chapter 3: Starting to UVMap
Lets open our UVMapping program, I am using UVMapper Beta. Then open up your Chair.obj file.
At first it will look like a huge mess. To make it a little more manageable I am going to separate the groups. To do this I am going to go to Edit -> Tile -> By Group. I check the "Gaps in Texture Map" selection so that there is space between the UVMaps and then OK. Now it looks a little neater.
Now I am going to remap each object to my liking. Go to Edit -> Select -> By Group and choose your group which you would like to remap, I am going to do the "Arm" group first, and click ok. This will highlight that group. Since this group was made from a cylinder with an end I am going to map it like one. Go to Edit -> New UVMap -> Cylindrical Cap. A window will pop-up so you can choose from which point of view you want to map your group. I am going to keep it as the default since that is what I need, but feel free to play around with this until you find the one that you like most. So I am going to click OK.
Since all of the groups I made are cylindrical I am going to use the same steps again until all of my groups have been remapped. If you have used other shapes then I would choice the mapping option which suits your group better. Play with this and have fun.

Now I have maped the groups I had, now I am going to tweak them to my liking. First I am going to click and drag my mouse around the bottom rounded rectangle of my seat UVMap and move it over the top one, I find it easier to do this in full screen. I am then going to select both of those and go to Edit -> New UVMap -> Planar. Once again I am going to use the default of the Y Alignment. I am also going to check the "Do Not Split" option. This will give me a straight on point of view for the UVMap so the two ends will be mapped in the same area and use the same texture later. I also notice that I missed a part of the arm top which we removed I will remove that first thing after we go back to MilkShape
That is all we are going to do in the UVMapper for now. We will come back when we have some more parts to our mesh, but we won't be changing these uvmaps anymore. So lets save our model. Go to File -> Save Model. A window will pop up, just click ok. Now give your model a new name. I am naming it Chair2.obj.
That is all we are going to do in the UVMapper for now. We will come back when we have some more parts to our mesh, but we won't be changing these uvmaps anymore. So lets save our model. Go to File -> Save Model. A window will pop up, just click ok. Now give your model a new name. I am naming it Chair2.obj.

Chapter 4: Back To MilkShape
Re-import the mesh back into MilkShape using the File -> Import -> Wavefront OBJ. Find your file that you just saved in your UVMapping program and click open. Now I am going to remove those faces I forgot. I am going to start duplicating the legs group (ctrl+d). In the groups tab I am going to double click on the leg group and duplicated it once so that I can then scale it down and rotate it to make a spoke. I am going to rename the spoke in the groups tab so I can keep it tidy.
Re-import the mesh back into MilkShape using the File -> Import -> Wavefront OBJ. Find your file that you just saved in your UVMapping program and click open. Now I am going to remove those faces I forgot. I am going to start duplicating the legs group (ctrl+d). In the groups tab I am going to double click on the leg group and duplicated it once so that I can then scale it down and rotate it to make a spoke. I am going to rename the spoke in the groups tab so I can keep it tidy.

Now I am going to I am going to shape the seat to give it a slight curve. I will do this with the move tool. I am then going to duplicate it, rotate the duplicate, and scale it to make up the back of the chair. I rename this part as well in the groups tab.

We can start building part of the chair now. I am going to use the move tool to move the seat up to the height I want then I am going to slant the chair leg slightly by rotating it freely (have all the axes checked and dragging with the mouse) until it is to my liking. Then I move it into place using the move tool. Once that looks good I am going to duplicate the led and mirror it from front to back then left to right and back to the front. Then I am going to move the spoke into place and adjust it as needed (scaling), then duplicate it and mirror it to the other side. Once that is done I am going to move the back up to the proper place and tweak it as needed, then I will tilt it slightly. Time to rename all those duplicates now in your groups tab.

Now we are going to add the rectangles which are holding the seat up. I am going to do that by making a box and scaling it to the right size. I will also use the move tool to move it to the right spot. Now I am going to scale the bottom of the rectangle to give it a slight tapering. I need to move it again to make sure it is aligned right. We will create the rest of the rectangles once we UVMap this one. For now I am just going to rename it in the groups tab and move one to the arms/back.

For the back/arms I am going to rotate the mesh and start rotating and moving until I get the shape I want. There isn't really a way to explain what I am doing besides that. When that is done I am going to move it into place and tweak it as need to fit where I need it. Once I have it in the shape and size I want I am going to duplicate it and mirror it and move it into place. I check the back vertexes to make sure they are lined up correctly then I weld them together. Lastly we are going to rename the duplicate in the groups tab.

Chapter 5: Finishing the UVMaps
Now I am going to separate the subsets I want my meshes to have. One will be the legs, back/arms, and the little pieces under the seat. The other will be the seat and back part. Make sure you save your mesh before you do this. Either export it as an .obj or as a milkshape file. Then I am going to select the pieces of the mesh I want to be in one subset and delete them. I then save the other pieces as a new .obj (frame). Simply press ctrl+z to make the other pieces come back and do the same again, this time delete the pieces you just saved and save what is left as a new .obj (seat).
Now I am going to separate the subsets I want my meshes to have. One will be the legs, back/arms, and the little pieces under the seat. The other will be the seat and back part. Make sure you save your mesh before you do this. Either export it as an .obj or as a milkshape file. Then I am going to select the pieces of the mesh I want to be in one subset and delete them. I then save the other pieces as a new .obj (frame). Simply press ctrl+z to make the other pieces come back and do the same again, this time delete the pieces you just saved and save what is left as a new .obj (seat).

I am now going to open each .obj in the UVMapper and tweak the UVMaps to my liking. For the most part I will select the group or groups I want and move them over and re-size them since I did most of the actually UVMapping earlier. Any duplicate you made will automatically have the same UVMap as the one you duplicated it from. I am going to start with the seat. I load the .obj and go to Edit -> Select -> by group. I select the "back" group and click ok. As you see it selects the same area as the seat group but since I didn't regroup them I can move the back group over without messing up the seat uvmap. Now I am going to re-size this UVMap since the back is smaller then the seat. I do this by dragging the edges over. Once I get the scale I like I select just the rounded rectangle shape of the back and make it thinner, I'm going to go into full screen for this. When the scaling is to my liking I am going to move the back group over to below the seat group and select them both I am then going to re-size them (by pulling the edges) to make them fit the whole screen. I take it off full screen to see how it looks in a plain square. I am going to tweak the back group a little more to make it longer. I am going to do the same to the seat group to make it more of a rectangle. Since I re-sized the top of the seat I really should re-size the sides, but as you can see there is no space. So what I am going to do is put the UVMapper back into full screen and select half of the sides UVMap and move it over and on top of the other half. I then re-size it to a better size that will look better on the re-sized seat. This means that the 2 halves will share the same texture. I take it off full screen once more to see how it looks on a square. If you need to fix anything else you can keep going until you are happy with it. I am happy with this so I am going to save the model as "Seat2" and save the texture map as "Seat" on a 512x512 sized image. That is it UVMaping this subset. You can now re-import it back into MilkShape and regroup the two groups. I will rename it "seat" and make sure you save it. This will be one of my subsets for the finished mesh.

Now I am going to load the frame.obj into the UVMapper. Since we made the rectangle after we UVMapped the other bits I am going to quickly UVMap it and then save the model as Frame2.obj and re-import it back into MilkShape so I can duplicate it a few times and finish building the frame of the mesh. After I have the basic forum I want to the rectangles I am going to delete the ends (since they won't be seen) and rotate them slightly to blend better with the legs. I finish with any other tweaks they might need then I save it as frame.obj and head back into the UVMapper. You might want to rename the duplicates before saving but I forgot to. It would just make it easier to identify the parts in the UVMapper.

Now we can build the frame UVMap. So lets load the frame.obj into the UVMapper. I am going to start by selecting the legs and making them narrower and moving them over for later. Then I am going scale the spokes to the right size in comparison to the legs. I am going to separate the legs and pokes now so that they will each have there own texture.You might needed to scale them some more to get them to fit where you want. Once they are to my liking I am going to move on to the rectangles. I am going to serape the longer rectangles and shorter ones and scale them to the right size and move them around until they are to my liking. I am going to keep the arms as they are since I want them to share their texture. You can of course separate them if you like. For now I am just going to tweak everything and rearange it until it is looking good and then I will export it as Frame2.obj and save the texture map at 512x512 as Frame.bmp. We are done UVMapping.

We can now re-import the frame2.obj in MilkShape and regroup everything and rename it. Then we can import the seat.obj. These are our two subsets for the finished mesh. I am going to export these two groups together and save them as a milk shape file just to feel safe. I am saving it as Chair.obj and I will give the milkshape file the same name. We are almost done now but we still need to re-size the whole chair and move it to the proper placement or else it will not work right in game. I am using my Ikea Inspired Nook Chair's obj for this. I will link it here for anyone who wants to use it. I am going to move the mesh that I just made over to the right position then I am going to use the scale tool to make it the right size. Now I can remove the Ikea Inspired Nook Chair's groups. You can keep the plane under the chair for the Shadow later. If you need it bigger then re-size it to fit. Now I am going to save this mesh once again as Chair&Shadow.obj and this will be our final .obj.

Chapter 6: Texturing
Now we can start texturing our mesh. Open up your Image Editing Program, I am using Corel Paintshop Pro x4. Open up your Map Textures that you saves in the last chapter. You then need to open the textures you are going to use. I am going to match the chairs to a table I've already made, so I am opening the .psd from that. I am going to start with the Seat UVMap. Make a new raster layer in top of the UVMap and add your texture there. What your texture looks like it completely up to you. I am using a wood texture from Goat that I have changed the color of a few times and my normal pine texture for recolors. I will show you have I put the shadows on my textures though. Go back to your UVMap, if you need to you can hide your texture layer, and select the areas outside the lines. On the edges of the seat and back I am going to deselect the two horizontal ends. Then I am going to use the "Drop Shadow" Tool to drop a shadow. In the picture you can see the settings tend to use. Make sure it drops the shadow onto a new raster layer. Drag that layer up to the top of your layers in your layers palette. I fill in the shadow a little more using the fill tool with black that has an opacity of 10. I fill it about 4 times until it matches the darkness of the shadow. You can deselect now and blur the shadow layer slightly. I am done with this texture so I am going to save it as a .png and as a .psd. The .psd will make it WAY easier to make recolors later. I am going to do exactly the same thing to the Frame UVMap except the texture will be going in two different directions. I do this my coping to a new image (ctrl+c then ctrl+v+shift) and rotating it before adding it to the new UVMap.
Now we can start texturing our mesh. Open up your Image Editing Program, I am using Corel Paintshop Pro x4. Open up your Map Textures that you saves in the last chapter. You then need to open the textures you are going to use. I am going to match the chairs to a table I've already made, so I am opening the .psd from that. I am going to start with the Seat UVMap. Make a new raster layer in top of the UVMap and add your texture there. What your texture looks like it completely up to you. I am using a wood texture from Goat that I have changed the color of a few times and my normal pine texture for recolors. I will show you have I put the shadows on my textures though. Go back to your UVMap, if you need to you can hide your texture layer, and select the areas outside the lines. On the edges of the seat and back I am going to deselect the two horizontal ends. Then I am going to use the "Drop Shadow" Tool to drop a shadow. In the picture you can see the settings tend to use. Make sure it drops the shadow onto a new raster layer. Drag that layer up to the top of your layers in your layers palette. I fill in the shadow a little more using the fill tool with black that has an opacity of 10. I fill it about 4 times until it matches the darkness of the shadow. You can deselect now and blur the shadow layer slightly. I am done with this texture so I am going to save it as a .png and as a .psd. The .psd will make it WAY easier to make recolors later. I am going to do exactly the same thing to the Frame UVMap except the texture will be going in two different directions. I do this my coping to a new image (ctrl+c then ctrl+v+shift) and rotating it before adding it to the new UVMap.

Before making any recolors I am going to test the textures I made on the mesh and see if anything needs to be changed. Go back to MilkShape and go to the Groups Tab and select one of your groups. I am going to start with "Frame". After I select the group I am going to go to the Materials tab and click new. Click on the first and pick your texture. Click Assign and the texture will show on your mesh. Repeat for any other groups. Now you will see your textured mesh in the 3d preview screen. I notice a few areas that I don't like the shadow on so I am going to go back to my imaging program and fix those then check them again. Just keep doing this until you are happy with it.

The last thing I am going to cover in this part of the tutorial is the Shadowing underneath the chair. You can also do this around the chair to get shadows on the wall but for the most part they are unneeded for dining chairs so I am only going to do the "GroundShadow". We are going to need to get the UVMap for the plane we left under neath the chair. To do this I am going to select the seat and frame groups and delete them. Then I am going to save the plane as a .obj, I will name mine shadow.obj. In MilkShape hit ctrl+z to bring your mesh back. Now we are going to open the shadow.obj in the UVMapper. Save the texture map as a 256x256 image and open it in your imaging program. This is how I make shadows though you might find a way you like more. First I go back into MilkShape and select the ends of the legs of the chair. Then I make a print screen and paste it into my imaging program. I select the plane in the lower left side and copy it. I make a new raster layer over the UVMap of the shadow and then select the main square. I paste the the copied part into the selection my using ctrl+shift+l. I make another raster layer and move it in between the ones that are there. The shadow works on an alpha plane which means that the darker something is the less it will show. I like to start with the darkest to lightest. So we want to fill the UVMap part in the layers palette in with black. Now on the layer we just made I am going to select the chair by hand and fill it in using a lighter shade. It does not need to be perfect at all. Now I am going to select the legs and give them a lighter shade. Then I select the very ends of the lefts (the red parts) and make them the lightest color. Lastly I am going to blur it with a Gaussian blur. I always set it to 6 for shadows. You can now save this and test it in MilkShape. Check it and make sure it lines up the way you want and see if it needs to be changed any. I am going to go back and add some lighter colors for the spokes. Mess with the colors and shape in your imaging program until you are happy and remember to save.

You can go back now and make your recolors if you want with your .psds and testing them in Milkshape. You can also continue tweaking the mesh to your liking. I did go back and give the arms and back a slight angle but the end product will be saved for when I release it. This chair will be part of my 500+ Tumblr Followers Gift. I will add a link when it is posted so you can go grab it.
That is it for this part, next time I'll show you how to add all off these parts into a package to make a object and we will test it in game to see how it looks.
That is it for this part, next time I'll show you how to add all off these parts into a package to make a object and we will test it in game to see how it looks.


No comments:
Post a Comment